Lightspeed Integration
On the market for a sophisticated search solution that wouldn’t require complex coding and the endless frustration that comes with? Get your search up and running in minutes with our plugin tailored for Lightspeed sites!
In this article, we’ll cover the installation process for your brand new search as well as all the features it will come equipped with. Let’s dive right in!
Lightspeed features overview
Installation
There are just four steps you need to take as you embark on the journey towards impeccable search experience for your users:
1. Install the plugin:
To add our plugin to your site, you can either search for “Site Search 360” in Lightspeed’s App Store (found in the left side panel under Apps -> App Store) or simply follow this direct link.
Once you find the plugin, press the "Install App" button in the top right corner of the screen to be redirected to your project's Control Panel:
At this point you’ll be logged in automatically. The password will be sent to the email address listed as your Lightspeed store owner, but you can change it whenever you see fit in the Site Search 360 Control Panel under Account -> My Profile.
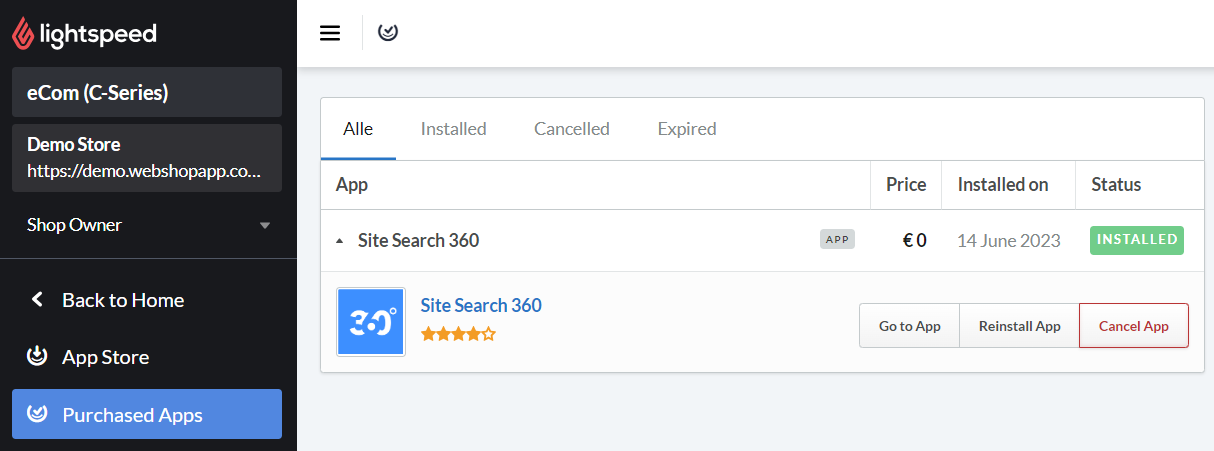
Protip: Once you install the app, you can access the Control Panel either through our plugin’s entry in the App Store or the “Purchased Apps” section of the left side panel menu:

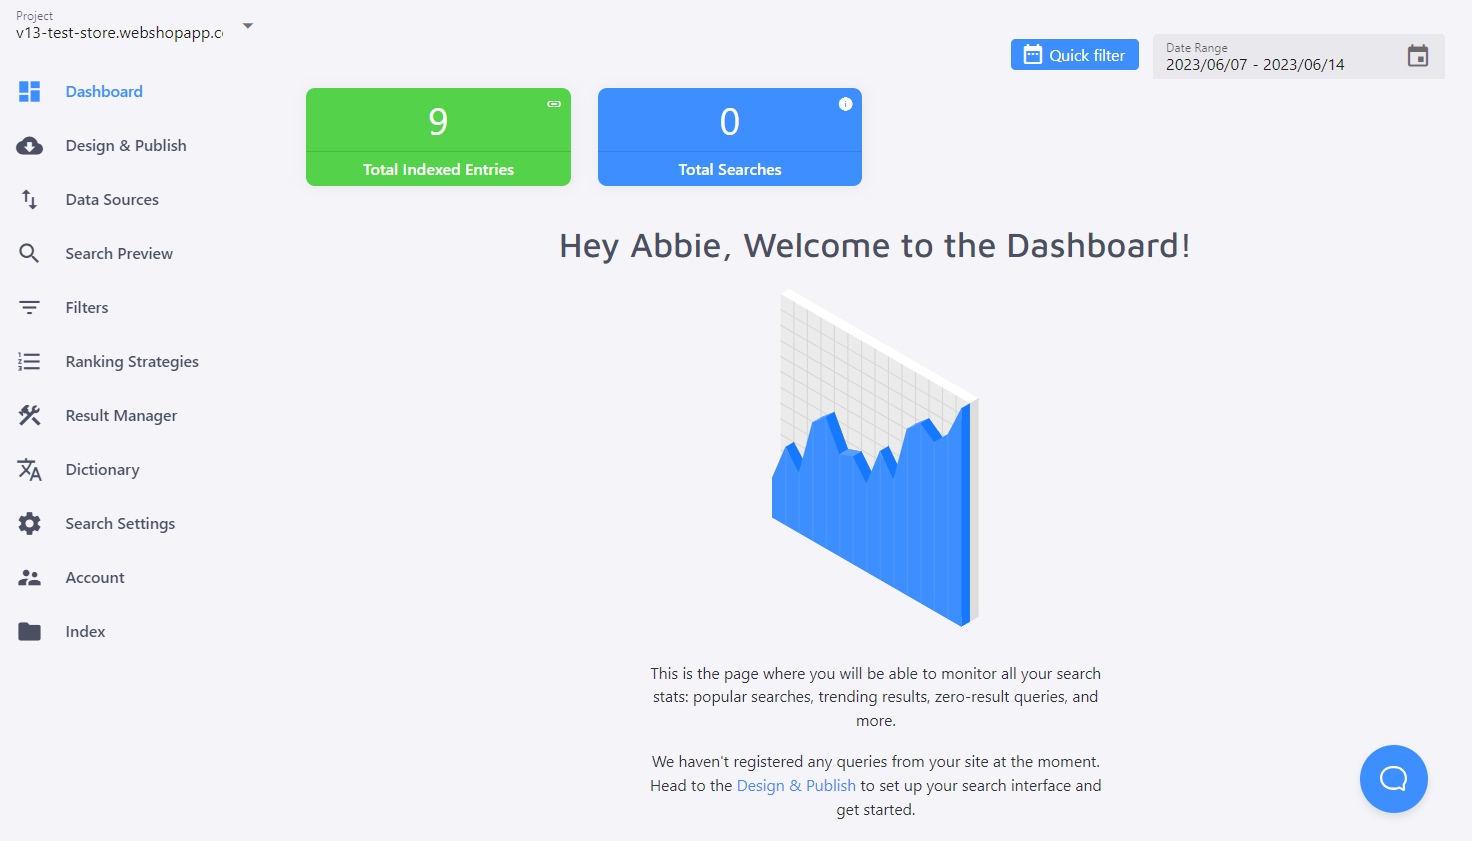
The part of the Control Panel you’ll first see upon logging in is your Dashboard. Initially, it will only show how many pages we have successfully indexed from your site, but once you start actively using the plugin, this page is where you’ll find data about your search’s performance, like which search terms your users type in most often and which ones return zero results, which results and suggestions get the most clicks, and that’s just the tip of the iceberg. You can learn more about the data we extract from the search activity on your site in our article on Dashboard Analytics.
2. Connect Site Search 360 to a search bar:
This, among other things related to the look and feel of your search, is configured in our Search Designer.
Go to Design & Publish -> General and scroll down to the “Search Bar” section. There you can choose to either “Use existing search bar” or “Add a search bar to website”.
Most Lightspeed themes come with a search bar that we can instantly connect our search to. Still, if you are not getting any results upon entering a query or if the search button isn’t working once you activate the app, you can always change the automatically detected CSS selectors to make sure Site Search 360 is initialized properly (and linked to all search bars if you have more than one).
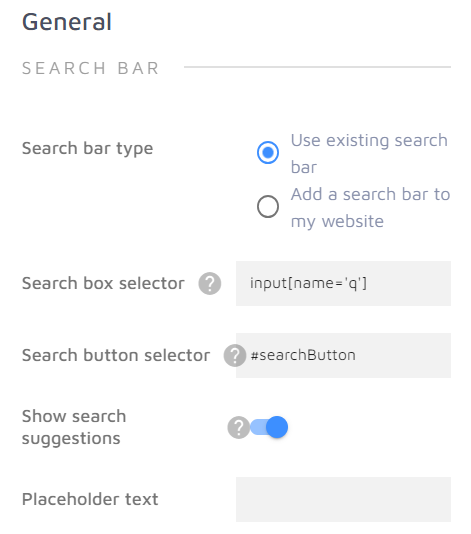
If you choose to add a new search bar, you’ll have to provide CSS selectors that would point our app to the element where it should be placed.
Remember that if you want the search to be available in the exact same spot on every page of your site, you’ll need to pick a selector that is present on all of them.
3. Go through the settings available in Design & Publish and configure the look and feel of your search.
4. Move the ”Activate” toggle to ON under Design & Publish -> General:

This will instantly add the search to your live site, either connecting it to the search bar you already have or adding a brand new one.
If you ever need to temporarily disable the search, feel free to move the “Activate” toggle to OFF. You can then safely re-enable it without losing any of the configured settings.
Protip: you don’t need to activate the search to test out its settings. You can do so in your Control Panel: there’s a separate Search Preview tab where all changes to your search’s configuration are reflected as well as a preview window on the right side of the screen in “Design & Publish” where you can check out what the search will look like on the live site without actually changing anything about the site’s design.
And with that you’re all set!
Lightspeed features overview
Design & Publish
We’ve already established that this section corresponds with your search’s design and some of its settings. And there’s a lot you can do with it in both regards!
Check out our article dedicated to Lightspeed's Search Designer for a full overview.
Data Sources
The Data Sources tab of the Control Panel shows every source our crawler uses to populate your search results.
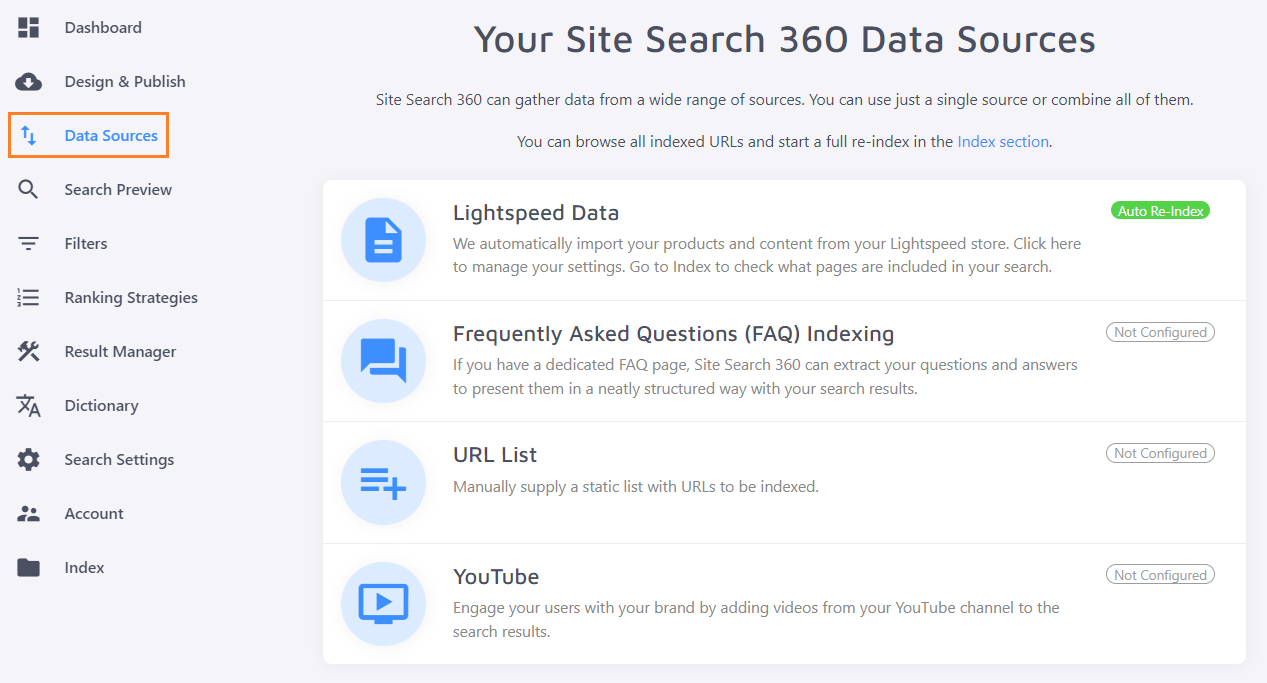
As stated before, we automatically pull data from your Lightspeed store when you register (though it may take up to 20 minutes to add all of the available pages to the search results, especially if you have thousands of products). The list of those pages is only accessible in Lightspeed’s admin panel under "Products".
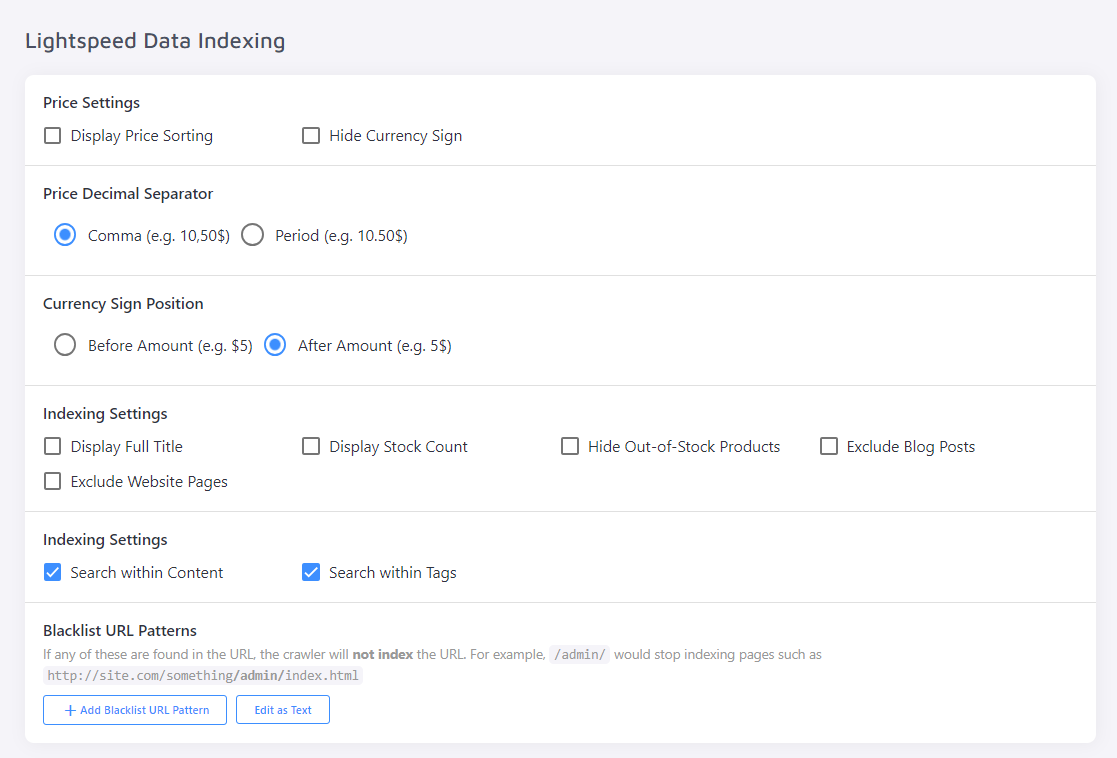
The Lightspeed Data settings refer to how your Lightspeed-powered pages should be presented:
Keep in mind that you are by no means limited to Lightspeed pages when it comes to your search results sources. You can also add a dedicated FAQ page, create a URL list containing pages not found in your Lightspeed store (perhaps hosted on a separate domain) or even index your YouTube channel (though this one is an add-on feature not included in our plans by default).
Search Preview
This nifty section allows you to check out what your search will look like without switching to the Search Designer. It can come in handy, for instance, when you need to see if the changes you’ve made to your search configuration are indeed what you were looking for as well as test the search itself (say, to see which results will be returned for a specific query, which Result Groups they belong to, how your search snippets look, etc.)
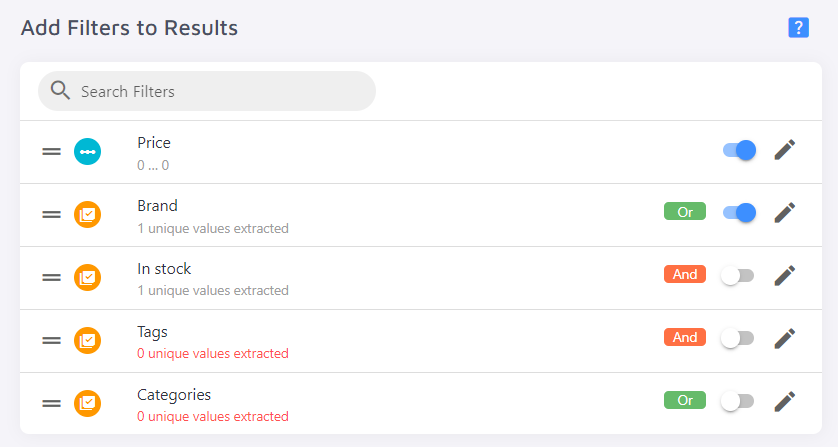
Filters
Filters and their values are, among other types of data, extracted directly from your Lightspeed store, yet you can still change them up a bit right in your Control Panel.
On the main Filters page you can, for example, choose which filters should be displayed in the live search and which should be hidden by simply moving the respective toggle to OFF:
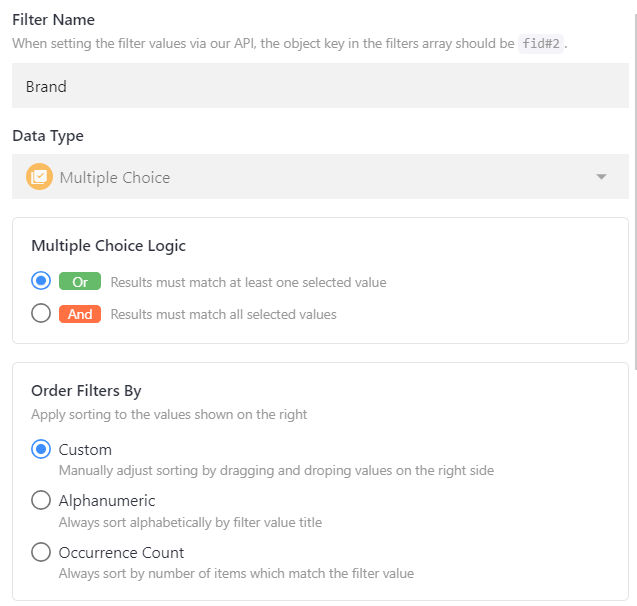
For each specific filter you can also:
Change its name, choice logic and sorting order:
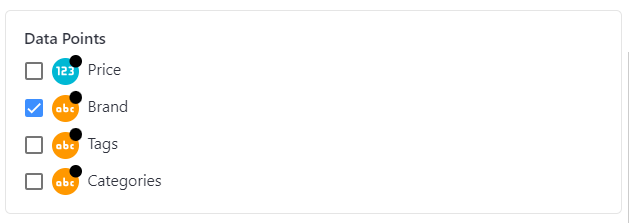
Choose which data points should be used as extraction criteria:
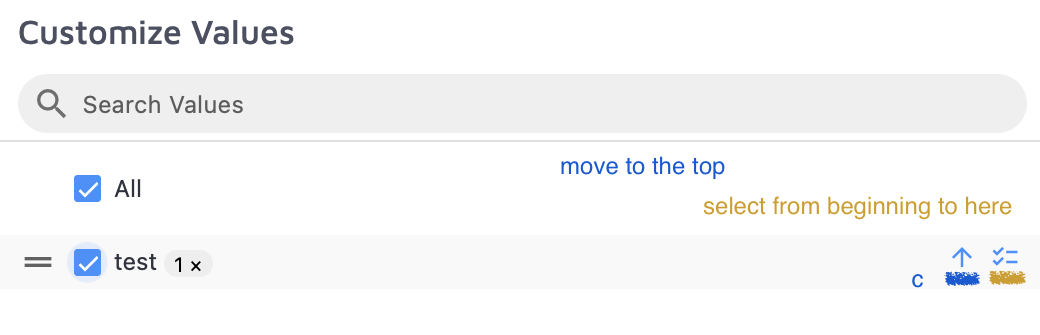
Configure which values should and shouldn’t be shown as well as move specific values to the top of the list and limit value selection from the first extracted value to any value of your choosing:
See how the filters could look and function on your site in our Filters demo.
Ranking Strategies
This section will allow you to rank specific subsets of pages higher or lower than others based on URL Patterns or priority tags placed in your pages’ structure.
Check out our dedicated article for a step-by-step guide on changing your search results hierarchy.
Result manager
There are three separate tabs in this section, each more exciting than the last.
This tab will allow you to:
Customize results for any given query: boost, reorder and hide specific results as well as blend in results for other queries when the original query is triggered (i.e. if you want some “ukulele” entries to pop up in your users’ search for “guitar”) and automatically apply filters and sorting orders to the result set
Rewrite a query to have results for a specific search term be displayed when an entirely different one is triggered (for instance, if your British users are shown trousers when searching for “pants”, and you would like to return “underwear” results instead)
Redirect a query to a specific page instead of showing default search results
All types of mappings can be applied indefinitely or within a specific timeframe (i.e. when you have a promotion going) at the end of which the results set for the mapped query will revert to default.
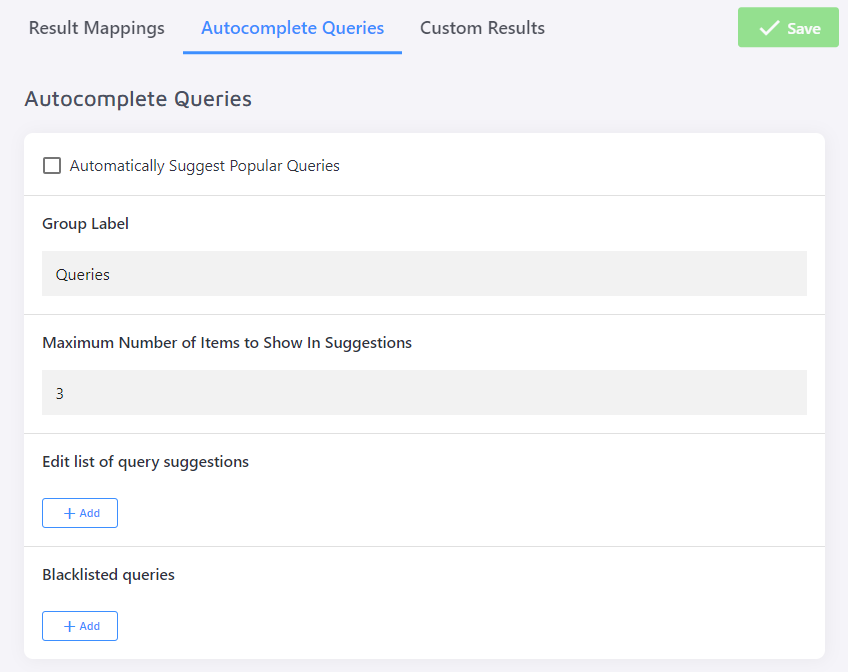
With suggested queries, you can either:
Display the queries that your users have searched for most often throughout the last 90 days
Suggest any queries of your choosing that will be displayed if they match the first few letters of the query your user actually types in (3 by default)
These queries will be presented as clickable search terms, so clicking on them would lead your users to a result set rather than a specific page.
You aren’t limited to pages our crawler has indexed from your Lightspeed database when it comes to setting up Result Mappings. You can also add pages from other domains to your curated result sets and even create custom ones (be it regular pages or promotional banners).
You can learn more about our Result Manager in this comprehensive guide.
Dictionary
Dictionary works similarly to "Rewrite trigger to" Result Mappings.
You can either make search results for one query appear for another (and vice versa) by making those queries synonyms or create unidirectional alternate spellings.
Protip: Synonyms are extremely helpful when your search fuzziness is set to “strict” because you can continue having your results match the search queries perfectly but make exceptions for particular terms. They will also allow you to automatically suggest relevant pages for queries that are often misspelled or return zero results (check your Dashboard Analytics to see what those are for your project).
This section is explored in more detail in our Dictionary article.
Search Settings
These are the basic principles that define the search process from query to results. Most of them are pretty self-explanatory, but here’s what you should keep in mind:
The Search Fuzziness settings refer to how closely the info extracted from the page needs to match the query. It ranges from “extremely strict” (aka matching the query perfectly) to “get more results” (aka somewhat matching the query - at least a few of the symbols entered). Fuzziness can be configured for your search results and your search suggestions separately.
The Search Snippet is the description shown under each search result. By default, it constitutes 300 characters around the query match in the page’s content, but you can manually add a “descriptor” element via XPath or Linked Data property as long as its pattern can be found on every page in your arsenal.
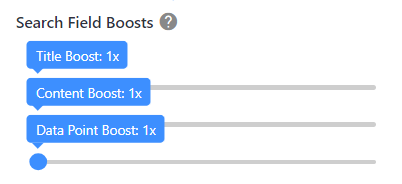
Search Field Boosts will allow you to automatically prioritize pages with query matches in the title or the content (Data Points are rendered void for Lightspeed users thanks to direct extraction of relevant info, i.e. product details, from the site’s database). Multiple boosting strategies can be used at the same time and with different values for each page element:
Protip: You can change and immediately test these settings under “Preview Settings” in the Search Preview tab to avoid fully re-indexing your project.
In this section you can configure the extraction strategy for your PDFs’ titles, content, and thumbnails based on the files’ content and their Meta Data:
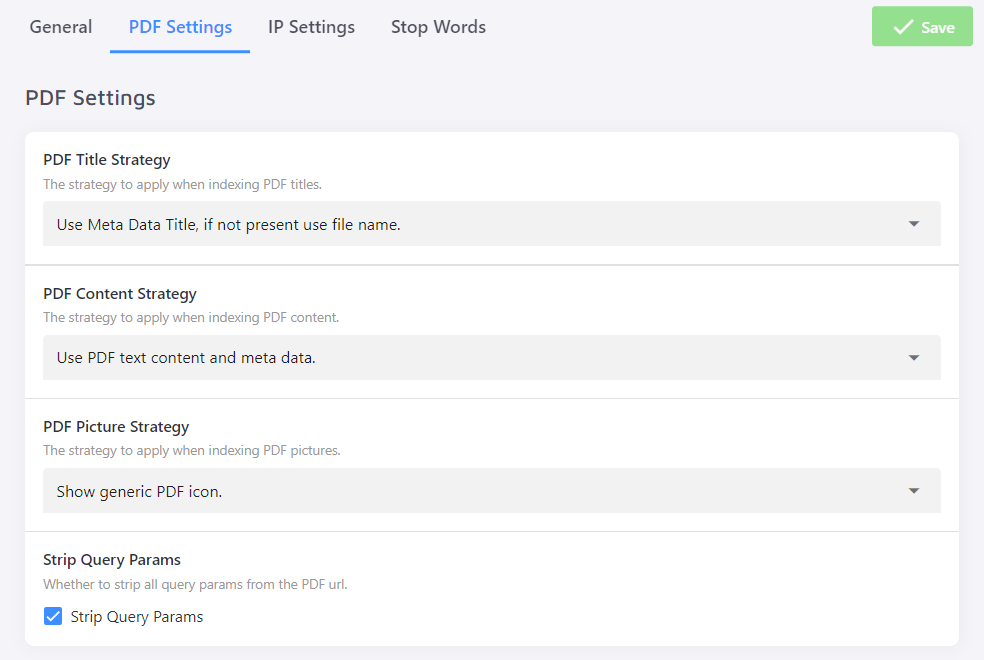
Note: By default all plans come with a PDF size limit of 15 MB. If your site has a bunch of larger files, contact us to set up a custom PDF indexing plan.
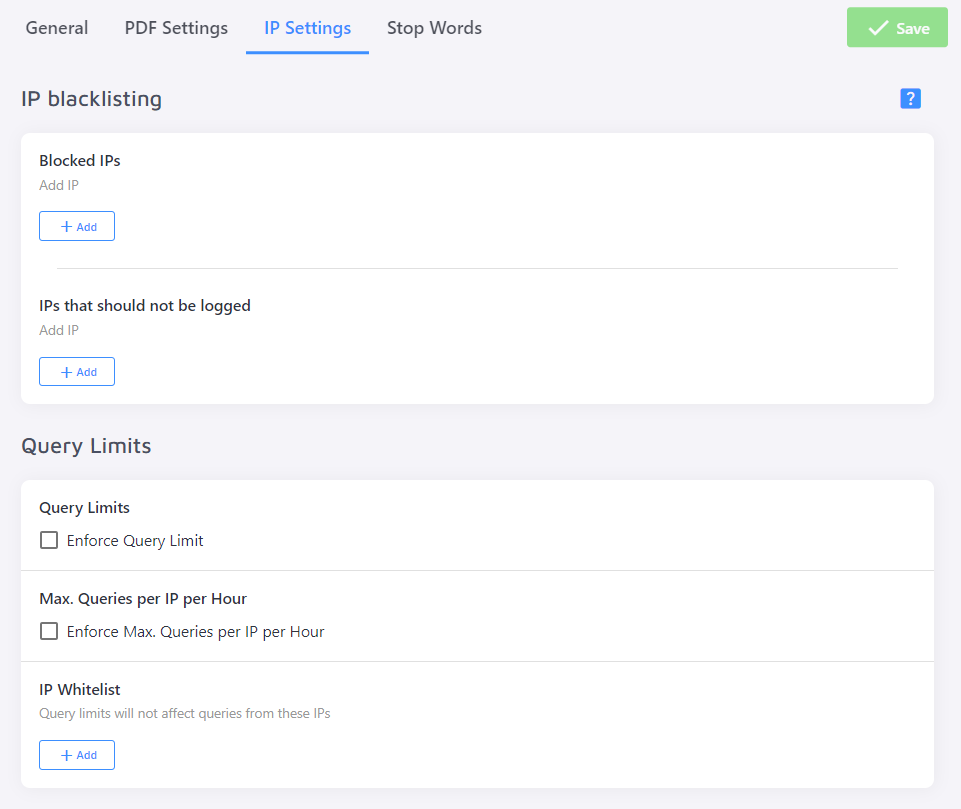
Besides blocking certain IPs from using the search and excluding others from your search stats, this tab can be used to enforce query limits - per IP per hour or generally, so as to avoid blowing past your search limit and paying an overage fee for each query over said limit:
By default, we strip certain words, like pronouns and articles, from the search query to make sure they don’t pollute the search with irrelevant content, but in certain cases, that can work to your detriment. If you run a book store, for instance, you'd want your users to be able to find (and purchase) a book called "Tell Me How It Ends", which would be impossible should articles be ignored. If you add them as stop words, however, they will always be treated as meaningful search terms and thus help create a fitting result set.
Learn more all the search settings we have to offer in our article on the topic.
Account
With this tab we move on from the intricate techy stuff to good old account management.
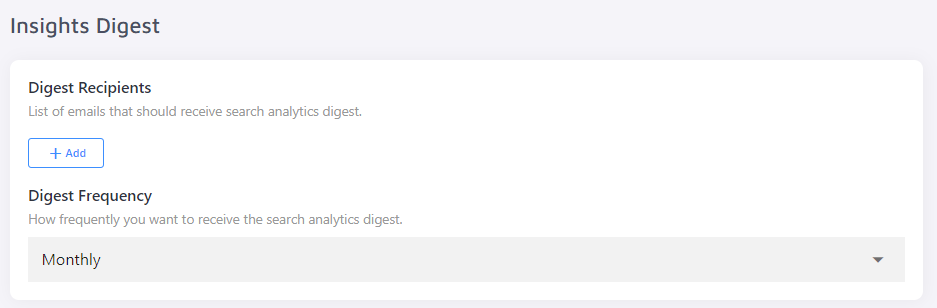
In addition to general information of your account, you can subscribe to insights digest of your projects at the bottom of this section:
This is where you need to go if you ever want to upgrade your project to another plan. You’re also by no means limited to our default plans - feel free to tinker with the settings and configure a custom one that would fit your every need.
If you choose to subscribe to a paid plan, here is where you’ll find your full billing info and all invoices, past and current ones, available for downloading.
If your store has multiple language versions, each will have its own project page. You can view all versions of your site and see basic stats for each of them, like the number of pages our crawler successfully indexed and the activity the search has had on that particular domain within the last day.
Note: if you choose to subscribe to a paid plan, you will only have to pay for the search installed on the main site - all other language versions will be included in your subscription by default.
You can have an overview of your user profile in this section.
Index
The Index Log shows all pages our crawler has managed to index regardless of whether they’re pulled from your Lightspeed data or added as part of your FAQ, URL List or YouTube channel.
For easier analysis you can filter your search results by their indexing status, content type, data source and/or update time:

This Index section is also where you can manually re-index your project to apply config changes to the search or purge your Index of all pages:

Protip: Any page can be removed from the search results manually either by pressing the red “Remove” button on the right of said page or in the “Remove Multiple URLs” section of the “Index” tab. However, if the product is still in Lightspeed database, it'll be added back to the index during the next update.
And with that we’re ending our Lightspeed plugin journey. If you still have questions about the functionality of your search, do not hesitate to drop us an email at any time.